Managing Contracts
This topic is subject to expert review. Please provide any feedback to Alemba Support.
You can specify the Analysts within your organization who are responsible for maintaining and monitoring these contracts.
Creating a Contract
Before you start
You must have Contract New selected in the Contracts tab of your Configuration Management security role to create contracts.
You must have Contract Stakeholders Write selected in the Contracts tab of your Configuration Management security role to link stakeholders.
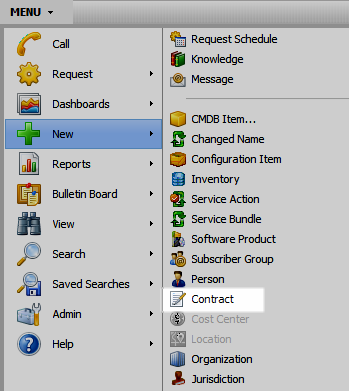
- Select
 and then New. From the submenu, select Contract
  .
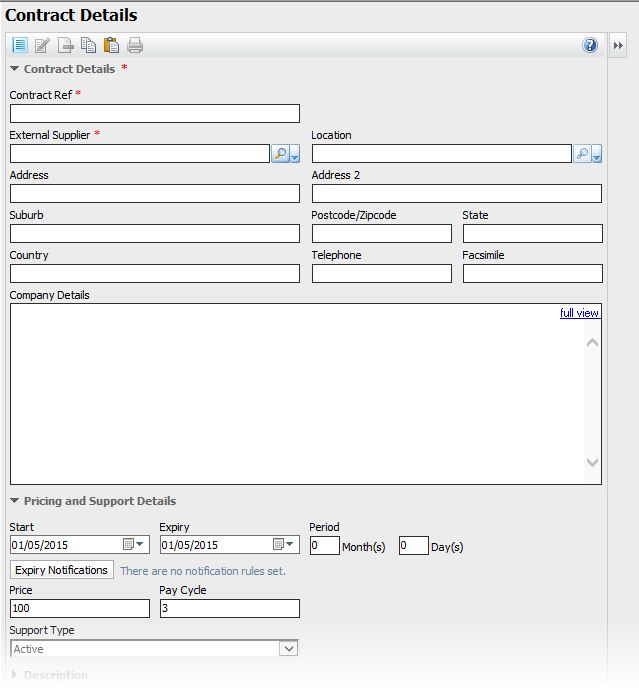
. - The Contract Details window is displayed
 . Complete the details.
 - Select the tabs at the bottom of the window to link CMDB items, external linked analysts and stakeholders to the contract
 .
. - Select
 to save your changes, or
  to save the details and open a blank details window in which you can enter the details for another new contract. Provide the Change Reasons if prompted to do so.
Changes made to this field will be tracked if it is selected in the Audit Trail options in the CMDB Settings window.

If your system has defined stakeholder roles for contracts, select a suitable role, such as business owner or group owner.
Contract Details Explorer
The Contract Details Explorer pane contains options or links to other windows and functionality that relate to the Contract. They include:
| Agreements |
This enables you to view all the agreements where the contract is specified in the agreement selection criteria. This option is only enabled if there is at least one agreement with this contract specified in the IPK or Workflow agreement selection criteria. |
| Contract Report | This enables you to view the details of a contract in a report format. |
| Object |
This enables you to attach objects or files from Windows applications to the current contract. You must have Contract Object Update selected in the Contracts tab of your Configuration Management security role to enable this option. |
| Forms | This enables you to capture general, non-reportable, non-searchable information about the contract. |
| Audit | This enables you to view an audit trail of the changes made to the details of the contract. |
Searching for a Contract
Before you start
You must have Contract View selected in the Contracts tab of your Configuration Management security role to create contracts.
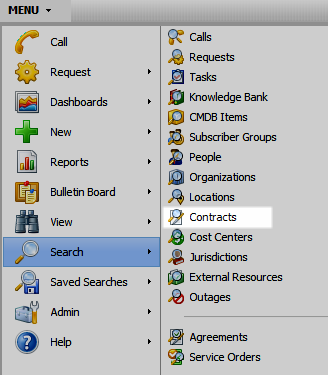
- Select and then Search. From the submenu, select Contracts
 .
. - The Contract Search window is displayed, and from here you can filter your search using the search criteria in the left pane.
- Filter the search by specifying contract, linked and/or date criteria. You must select at least one of these search criteria.
- To add more fields to your search criteria, select
 and configure your search criteria.
 - Select
 . The results are displayed in a browse table located in the right hand pane.
 - All contracts which match your search criteria are displayed in the search results pane (right) in a browse table. You can now do any of the following:
| Active |
to include currently active contracts |
| Deleted | to include contract/s that have been created, and subsequently deleted on your system |
| Partition | If you are using partitioning, select to filter contracts by a specific partition |
| Include Deleted Field Values | to include deleted field values in your contract search. Selecting this option updates the selected fields with values that have been deleted for those fields. For example, if you are searching for a contract by Created By, and you select Include Deleted Field Values, the Created By list will be updated to display analysts that you created and were subsequently deleted. You can then select a deleted value from the list, and conduct your search. |

|
to open a selected contract |

|
to delete a selected contract |

|
to refresh the results |

|
to adjust the columns |

|
to generate a ticket report |

|
to print the results |
Updating a Contract
Before you start
If a contract is locked for editing, you will be able to break the lock and take over the item if you have Contract Cancel Lock selected in the Contracts tab of your Configuration Management Security Role.
To update a contract, you must have Contract Update selected in the Contracts tab of your Configuration Management Security Role.
To update an object attached to a contract, you must have Contract Object Update selected in the Contracts tab of your Configuration Management Security Role. To cancel and ‘override’ a checkout of an object that is attached to a contract, you must have Contract Object Cancel selected, and to delete an object, you must have Contract Object Delete selected. To edit stakeholder details, you must have Contract Stakeholders Write selected.
-
 Display the Contract Details window, if it is not already displayed on screen.
- Search for the contract by selecting Menu and then Search. Search for and select the contract.
- Search for the contract from another details window using the Q/D button.
- Select
 on the toolbar to allow you to edit the fields.
 - Make the necessary updates.
- Select to save your changes, or to save the details and open a blank details window in which you can enter the details for another new contract. Provide the Change Reasons if prompted to do so.
Deleting a Contract
Before you start
To delete a contract, you must have Contract Delete selected in the Contracts tab of your Configuration Management Security Role.
You can delete a contract in either of the following ways:
- Search for the contract.
- Select the contract in the browse table and then select .
Alternatively, if the Contract Details window is already on screen, select to delete it.
Adding Expiry Notification Details
You can enable vFire Core to send a message or log a new call or request when a contract is about to expire.
Before you start
If a contract is locked for editing, you will be able to break the lock and take over the item if you have Contract Cancel Lock selected in the Contracts tab of your Configuration Management Security Role.
To update a contract, you must have Contract Update selected in the Contracts tab of your Configuration Management Security Role.
-
Display the Contract Details window, if it is not already on screen.
- If you are adding a new contract, select Menu, New and then Contract.
- If you are updating a contract, find the Contract using the Search menu option, or use the Q/D button from within another details window.
- Select the Expiry Notifications button in the Pricing and Support Details section.
- Select if necessary to activate the fields and buttons, and complete the details as follows.
- If you want the details on the new call or request to use the values specified on the template, leave the mapping table browse table blank. Otherwise, select
 below the browse table.
 - In the Add Fields popup, choose the fields you wish to map and select OK to display them in the browse table.
- Click in the Contract Field column next to the field title to specify its values. Each field is a dynamic field selector, that is, the way you can specify the value for the field depends on the type of field. Select the
 button. A popup with three tiers opens.
 - Select (Value) to select or specify a value for the field. The behavior of the field adjusts to the field type.
- For a select list (such as the Call Priority field), the list of values that may be assigned to the field pops up in the next tier. If you add the Call Priority field, for example, this is the list of call priorities defined in IPK administration. Simply choose the value you wish to set the field to this value when the entity is created.
- For a text field, type the value you wish to appear in the field when the call or request is created.
- For a checkbox, select True to select the checkbox or False to clear the checkbox when the call or request is created.
- For a CMDB Item or Person field, run a quick search for an item by typing the name into the field and pressing [Enter]. If a match is found, the item is selected in the field, otherwise, a list of matching items appears from which you can make a selection. To run a full search for an entity to add to this field, select
 .
.
If you change the type of entity to create (that is, change the Call or Request options), you will lose the fields you have mapped.
- Using the drop-down in the Update column, select the condition for populating the field when the call or request is created:
- To remove any fields, select the field and select
 .
.
| Days Before | specify the number of days prior to the contract expiry date when the notification/event will occur. |
| Contract Expiry Date | A read only field showing the contract expiry date. |
| Notification Date | The date on which the notification will be sent. This is automatically populated when you complete Days Before and press Tab or select another field. |
| Notify | Select to issue a notification if the contract is due to expire. |
| Select Recipients | You can use this field to identify the recipients of the notification. |
| Create a Call or Request | Select to create a call or request if the contract is due to expire. Then use the radio buttons to identify whether you want to send a call or request. |
| Using template | Use the  button to select the Call or Workflow Template to use to create the call. button to select the Call or Workflow Template to use to create the call. |
| Always | to update the field regardless of whether it already has a value from the template |
| Only When Blank | to update the field only if is blank |
There is an additional option, On Initial Population. This is used elsewhere in the system and is not applicable in this case.